

Start here
What Is Macramé and Why It Works for Wall Decor
Next
Choosing the Right Cord and Materials
Then practice
The Three Foundational Knots Every Beginner Needs
Finish strong
Mounting, Finishing, and Hanging Your Piece
What Is Macramé and Why It Works for Wall Decor
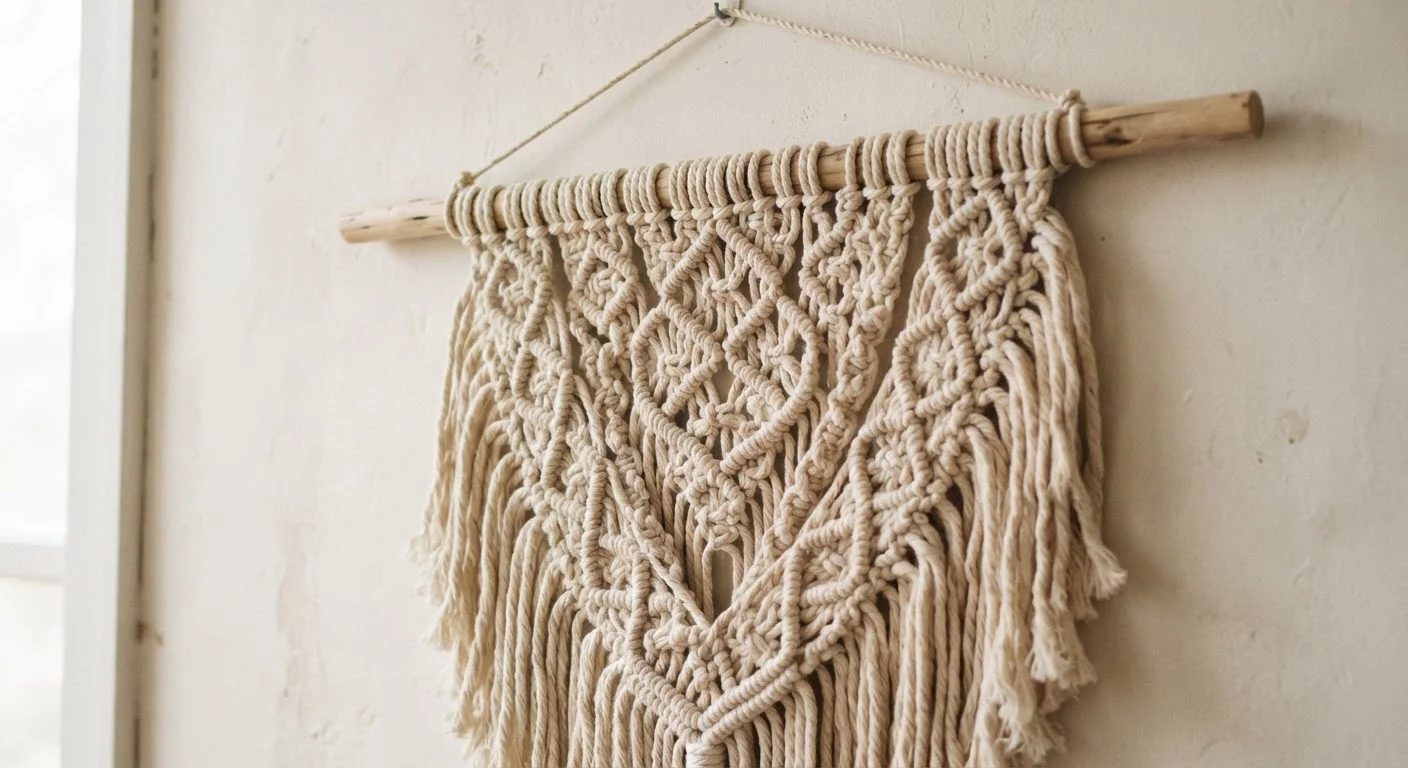
Macramé is the craft of creating decorative textiles by tying cords into knots - no weaving loom, no sewing machine, no specialized studio required. Its roots stretch back centuries across multiple cultures, and it experienced a major revival in 1970s America before becoming a dominant bohemian-modern decor trend that's held strong in contemporary interiors.
For DIY decorators, the appeal is obvious: the material cost is low, the learning curve is gentle, and a finished piece has genuine visual impact. A well-executed wall hanging adds warmth, texture, and dimension to any room - qualities that paint and prints alone rarely achieve. It also scales beautifully: a small 10-inch piece suits a bathroom nook, while a large statement hanging can anchor a living room feature wall.
Before committing to a spot, be sure to check our pre-project wall decor checklist to confirm your wall type, weight limits, and any rental restrictions.
Working cords
The active outer cords in a knot group that wrap around the filler cords to form the knot shape.
Filler cords
The passive inner cords held taut while working cords wrap around them to create a knot.
Lark's head knot
A simple folded-loop mounting knot used to attach individual cords to a dowel or rod at the start of a piece.
Square knot
A two-step, four-cord knot that produces a flat, symmetrical shape and is the core building block of most macramé patterns.
Half-hitch
A single looping wrap of one cord around another; doubled up, it forms the structural diagonal or horizontal bars common in wall hangings.
Fringe
The unworked cord ends that hang loose at the bottom of a piece, often brushed out into soft, fluffy texture for the finished look.
Choosing the Right Cord and Materials
The cord you choose affects how your knots look, how the fringe drapes, and how forgiving the whole experience is. Here's a practical breakdown:
- Single-strand (macramé) cotton cord: Soft, easy to unknot if you make a mistake, and brushes out beautifully for fluffy fringe. A 3-5 mm diameter is ideal for beginners.
- Three-ply twisted cord: Has a rope-like texture that gives knots a more defined, structured appearance. Slightly harder to brush into fringe but excellent for geometric designs.
- Braided cord: Smooth and strong; knots sit tight and uniform. Less suitable for fringe-heavy pieces.
Beyond cord, you'll need just a few additional items:
- A wooden dowel, branch, or bamboo rod to mount cords onto
- Sharp scissors (dull blades fray cord ends)
- A measuring tape
- A stiff-bristle brush or pet slicker brush for finishing fringe
- Optional: a comb, S-hook, and hanging rack or shower curtain rod to keep work at eye level while knotting
Natural undyed cotton is the most versatile choice for a first project - it pairs with virtually any color palette and feels tactilely satisfying to work with.
The Three Foundational Knots Every Beginner Needs
You genuinely don't need a large knot repertoire to create an impressive first piece. Master these three and you can produce dozens of design variations:
1. Lark's Head Knot
This is how you attach cords to your dowel. Fold a cord in half, lay the folded loop over the dowel, pull both loose ends through the loop, and tighten. It's fast, neat, and the universal starting point for wall hangings.
2. Square Knot
The workhorse of macramé. Working with four cords (two outer working cords and two inner filler cords), you complete a left-facing half-knot followed immediately by a right-facing half-knot. The result is a flat, symmetrical knot. Rows of alternating square knots - where you shift which cords are working and which are filler - create the classic net-like or diamond pattern seen in most wall hangings.
3. Half-Hitch (and Double Half-Hitch)
A single half-hitch wraps one cord around another in a simple loop. The double half-hitch (two successive wraps) is what creates diagonal or horizontal bars of texture across a piece. It adds visual movement and structure between sections of square knots.
Practice on a Mini Sample First
Cut 8 short cords (about 24 inches each) and mount them on a spare pencil or chopstick before starting your real project. Rehearsing each knot at small scale lets you build muscle memory without stressing about wasting good cord. Most beginners find their tension and consistency improve noticeably within 15 minutes of focused practice.
Practice each knot on a small test bundle of 8 cords before beginning your actual piece. Ten minutes of practice dramatically reduces frustration once you're working at full scale.
Mounting, Finishing, and Hanging Your Piece
Once your knotting is complete, the finishing steps transform a tangle of cord ends into a polished wall piece.
Trimming the Fringe
Hold the fringe taut and use sharp scissors to cut a straight edge, a V-shape, or an arched bottom - all are popular profiles. Cut conservatively at first; you can always trim more.
Brushing Out the Fringe
For fluffy, cloud-like fringe (the most sought-after macramé finish), separate the plies of each cord end with your fingers, then brush firmly downward with a stiff-bristle brush. Single-strand cotton yields the fullest result. A fine-tooth comb can neaten the final look.
Hanging the Piece
Tie a length of cord or thin rope to both ends of your dowel to create a hanger. For even balance, make sure both sides of the hanging loop are identical in length before knotting them to the dowel. Then review our wall decor hanging checklist to choose the safest mounting method for your wall - whether that's a picture hook, adhesive strip, or a nail into a stud.
Macramé pieces are lightweight, which gives you flexibility - but always match your mounting hardware to the actual weight of the finished piece and the wall material behind it. When in doubt, opt for a hook rated well above the piece's weight.
Frequently Asked Questions
A general rule of thumb is to cut each strand at four times the intended finished length of the piece. For a 12-inch-wide, 24-inch-long hanging, plan on cords roughly 96 inches long before mounting. Always cut a little extra - you can trim down but you can't add length once knotting begins.
The lark's head knot is the traditional starting point because it mounts cords onto a dowel quickly and neatly. Once comfortable with that, the square knot is your next essential - it creates the chunky, textured look most people associate with wall hangings.
Bulky or chunky yarn can work for very casual, texture-focused pieces, but it frays unevenly and knots less crisply than dedicated macramé cord. For a cleaner result with defined knots and smooth fringe, single-strand or three-ply cotton macramé cord is a better investment.
Wooden dowels (birch or pine), driftwood, and bamboo sticks are all popular choices. A 3/4-inch diameter dowel is sturdy enough for most beginner-sized pieces. Driftwood adds a natural, organic look but may have uneven weight distribution - mount it carefully.
Wrap a small piece of masking tape around the cut end of each cord strand before you begin knotting. For twisted or braided cords, a tiny dab of fabric glue on the tip also works. Remove tape carefully when the piece is finished.
Yes - a finished macramé piece is lightweight enough for adhesive picture-hanging strips rated to its weight in most cases. Check the strip manufacturer's guidance and review your lease terms first. Our pre-project wall decor checklist covers rental-friendly hanging options in detail.
The content on this site is for informational purposes only and is not a substitute for professional advice. Always consult a qualified professional for guidance specific to your situation.