

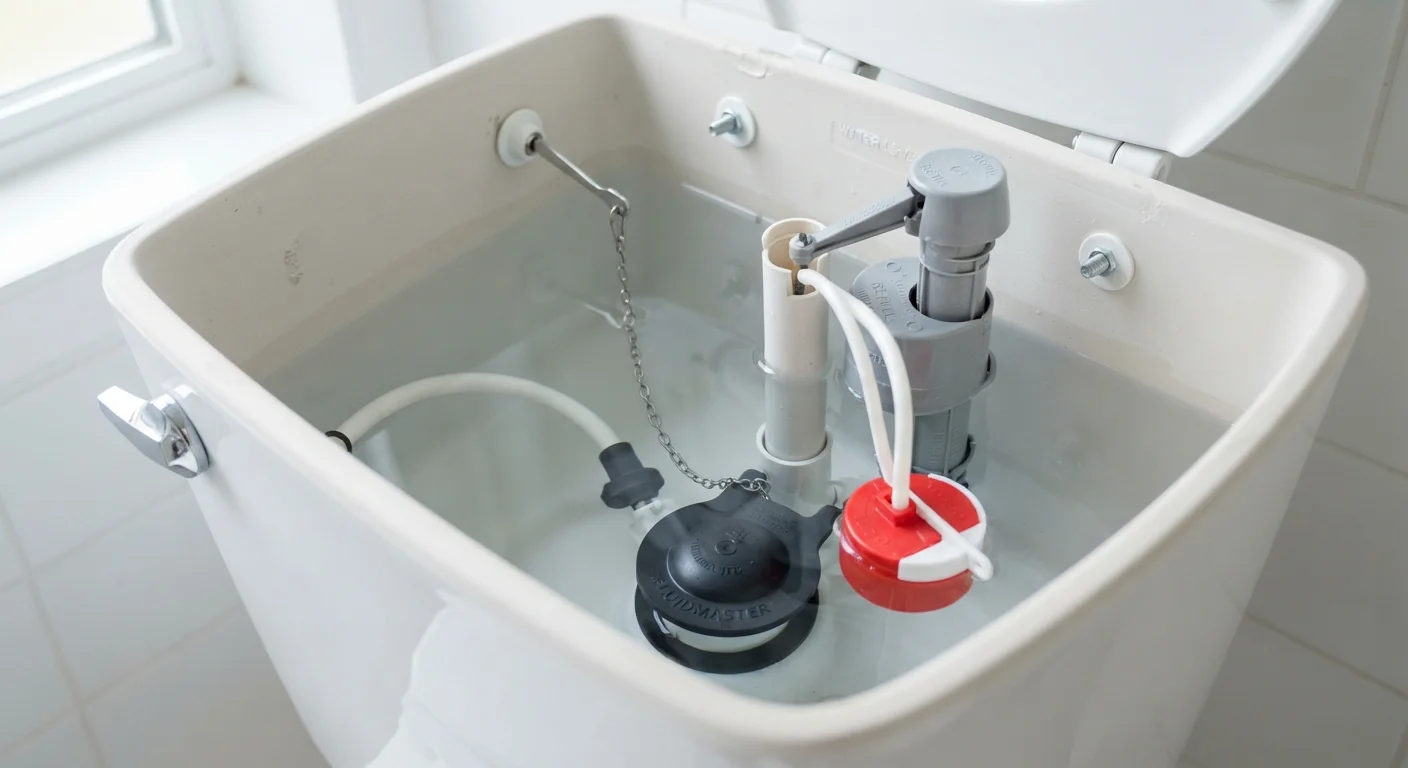
What's Inside the Tank and What Each Part Does
A toilet tank contains three core components, and understanding each one makes diagnosis straightforward. If you're new to home plumbing, the Homeowner's Introduction to Household Plumbing Systems provides useful context before you begin.
The Flapper
The flapper is a rubber seal seated at the bottom of the tank over the flush valve opening - the hole that lets water rush into the bowl when you flush. A chain connects it to the handle arm. When you flush, the chain lifts the flapper, water drains into the bowl, and the flapper drops back to reseal the tank for refilling. A warped, cracked, or mineral-coated flapper won't seal tightly, allowing water to trickle continuously into the bowl.
The Fill Valve
Once the tank empties, the fill valve opens to admit fresh water from your home's supply line. It closes automatically when the water reaches the correct level. A worn or debris-clogged fill valve may not shut off fully, producing a persistent hiss or slow trickle even when the tank appears full.
The Float
The float signals the fill valve when to stop. Older toilets use a large ball on a metal arm - called a ballcock - while most modern toilets use a cup float, a cylinder that slides up and down the fill valve shaft. As water rises, the float rises with it and eventually triggers the valve to close. If the float is set too high, water spills silently into the overflow tube (the tall central pipe in the tank) and runs into the bowl - a problem that's often mistaken for a faulty flapper.
Hard Water and Mineral Buildup
In areas with hard water, mineral deposits can coat the flapper and valve seat over time, preventing a clean seal even when the rubber looks intact. Before replacing parts, try wiping the valve seat and flapper rim with a cloth dampened in white vinegar to remove scale buildup. If the leak persists after cleaning, replacement is the appropriate next step.
Diagnosing, Fixing, and Confirming the Repair
Before touching any parts, remove the tank lid and watch one complete flush and refill cycle. This single step typically reveals the cause. Use the steps below to work from the simplest fix to the most involved. The same methodical approach used here is part of a broader whole-home plumbing audit worth doing periodically to catch problems early.
Shut Off the Water Supply
Locate the shut-off valve on the supply line at the base of the toilet. Turn it clockwise until it stops. Flush once to drain most of the water from the tank, then remove the lid and set it aside on a stable, flat surface.
Identify the Failing Component
Turn the water back on briefly and watch the full refill cycle. Check whether water is spilling over the top of the overflow tube (the tall central pipe) - if so, the float is set too high. If the tank fills and goes quiet but water still trickles into the bowl, press gently on the flapper with a gloved finger. If the running stops, the flapper isn't sealing. A hissing fill valve that runs on after the tank is full points to a worn valve.
Replace a Worn Flapper
With the water shut off, unhook the flapper chain from the flush handle arm, then unclip the flapper ears from the pegs on either side of the flush valve. Inspect the rubber - if it's stiff, warped, or shows a rough seating edge, replace it. Bring the old flapper when sourcing a new one so you can match the size. Snap the new flapper onto the pegs and reconnect the chain, leaving roughly half an inch of slack.
Adjust the Float Height
Turn the water on and let the tank refill. The water level should stop about one inch below the top of the overflow tube. On a cup-float valve, adjust by pinching the float clip and sliding the float down the fill valve shaft, or turn the adjustment screw if present. On an older ballcock-style float, bend the float arm slightly downward or use the adjustment screw. Flush and refill once more to confirm the level holds.
Replace a Worn Fill Valve
If adjusting the float doesn't resolve the running, replace the fill valve. With the supply shut off and residual water removed with a sponge, disconnect the supply line at the tank base. Unscrew the locknut holding the fill valve - usually hand-tight with a quarter-turn assist from a wrench. Lift out the old valve, insert the replacement (seating the shank properly), tighten the locknut, and reconnect the supply line with fresh PTFE tape on the threads. Turn the water on and adjust the float on the new valve to the correct water level.
Test and Confirm the Repair
Replace the tank lid. Flush two or three times and listen carefully after each fill. The tank should fill, the valve should go quiet, and no running sound should continue beyond 90 seconds. Repeat the food-coloring test if you want to confirm the flapper is fully sealing. Check all supply line connections at eye level for any drips.
If the toilet still runs after completing all steps, the issue may be a worn valve seat - the surface the flapper closes against - or a hairline crack in the overflow tube. A dripping tap follows a similar logic of worn seals; our guide on reseating a dripping tap walks through that parallel repair. For anything beyond tank components, consult a licensed plumber and verify local permit requirements before proceeding.
Know When to Call a Professional
If your shut-off valve leaks, fails to close, or is heavily corroded, do not attempt further repairs until a licensed plumber replaces it. If the tank itself shows a visible crack, or if the toilet rocks at its base, those issues go beyond tank components. Always check whether your local code requires permits for plumbing modifications before starting any work.
The content on this site is for informational purposes only and is not a substitute for professional advice. Always consult a qualified professional for guidance specific to your situation.