

Start here
Why Insulation Matters More Than Most Upgrades
Next
Key Insulation Materials Explained Simply
Then
Where to Insulate First: Priority Zones
Apply it
What DIYers Can Realistically Tackle
Before you begin
Safety Basics Before You Touch Anything
Why Insulation Matters More Than Most Upgrades
Heat doesn't stay where you put it - it constantly moves toward cooler spaces. In winter, warmth generated inside your home seeps outward through walls, ceilings, and floors. In summer, outdoor heat pushes its way in. Insulation slows that movement, acting as a thermal barrier so your HVAC system doesn't have to work overtime compensating for the loss.
Among home efficiency upgrades, insulation often delivers one of the strongest returns because it addresses a continuous, year-round drain on energy. Unlike replacing a single appliance, good insulation works quietly around the clock. For homes with inadequate insulation - which describes a large share of older US housing stock - closing that gap can meaningfully reduce energy use. For context on how insulation fits into broader home efficiency, see the Efficient Home Systems hub.
Get a Home Energy Audit First
Before buying a single roll of insulation, consider scheduling a professional home energy audit. Auditors use blower door tests and thermal imaging to show exactly where your home is losing heat - so you spend money where it counts most, not just where it's easiest to reach.
Key Insulation Materials Explained Simply
Choosing the right material starts with understanding what's available. Here are the most common types you'll encounter:
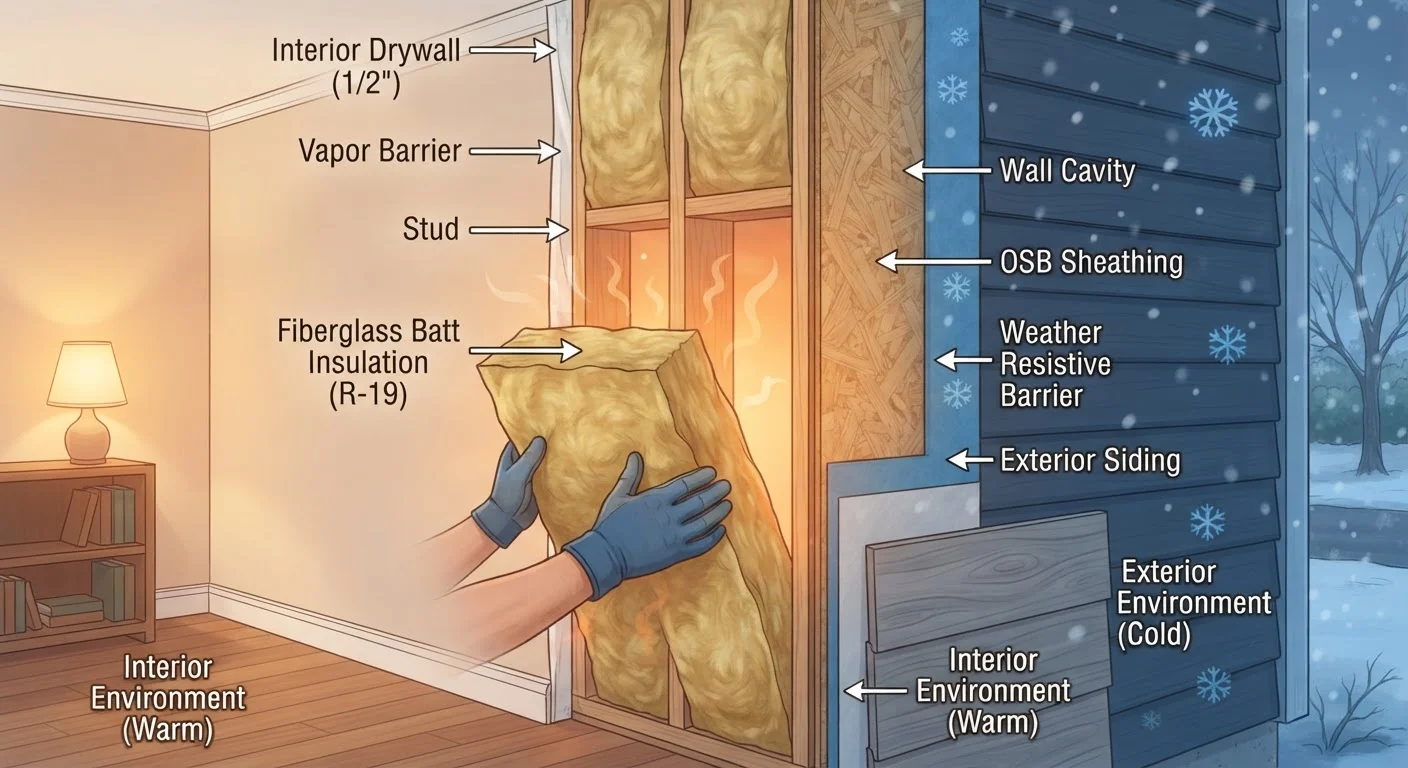
- Fiberglass batts: Pre-cut blankets designed to fit standard stud and joist spacing. Widely available, cost-effective, and manageable for DIYers in accessible areas like attics and unfinished basements.
- Mineral wool (rock wool) batts: Similar form to fiberglass but denser, with better fire and moisture resistance. Slightly more expensive but easier to cut cleanly.
- Blown-in cellulose or fiberglass: Loose fill blown into attic floors or enclosed cavities. Excellent for covering irregular spaces and topping up existing insulation. Rental blower machines are available, though technique matters.
- Rigid foam board: Dense panels used on foundation walls, exterior sheathing, or under slabs. Offers a high R-value per inch. Cutting and installation can be DIY-friendly in accessible areas.
- Spray foam: Fills gaps and expands to seal air leaks simultaneously. Small cans for cracks and penetrations are ideal for DIY; large-scale spray foam systems require professional application.
The Building Materials hub provides additional guidance on evaluating materials for specific project types.
R-value
A number that rates how well an insulation material resists heat flow. The higher the R-value, the better the material insulates.
Thermal barrier
A layer of material that slows the movement of heat between two areas - such as between the inside of your home and the outdoors.
Air sealing
The process of closing gaps, cracks, and holes in a home's structure to prevent conditioned air from escaping and outside air from infiltrating.
Batt insulation
Pre-cut rectangular sections of insulation material - usually fiberglass or mineral wool - sized to fit snugly between wall studs or ceiling joists.
Rim joist
The horizontal framing board that runs along the top of your foundation wall, connecting the floor joists. It's a common spot for air leaks and heat loss.
IC rating
A designation (Insulation Contact) indicating that a recessed light fixture is safe to be covered by insulation. Fixtures without this rating must remain exposed to prevent fire risk.
Where to Insulate First: Priority Zones
Not all insulation gaps are equal. Heat loss is most significant where the temperature difference between inside and outside is greatest, and where large surface areas are unprotected. Here's how to prioritize:
- Attic floor: Heat rises, so an under-insulated attic is often the single largest source of heat loss. It's also one of the most accessible areas to improve.
- Crawl space and basement: Insulating between floor joists above a crawl space or along basement walls reduces cold floors and moisture intrusion.
- Exterior walls: Older homes often have minimal or degraded wall insulation. Adding it typically requires more invasive work - either opening walls from the inside or drilling and blowing in fill from the exterior.
- Rim joists: The framing where your floor meets the foundation wall is a common source of air leakage. Rigid foam or spray foam cut to fit these cavities is a high-impact, low-cost fix.
- Air sealing first: Before adding any insulation, sealing gaps, cracks, and penetrations around pipes, wires, and ducts dramatically improves the effectiveness of whatever insulation you install.
For a comprehensive look at every insulation zone and material choice, this end-to-end insulation guide covers the full picture.
What DIYers Can Realistically Tackle
Plenty of insulation work falls comfortably within the reach of a motivated DIYer with basic tools and careful preparation. Tasks that tend to be manageable include:
- Adding batt insulation to an open, accessible attic floor
- Insulating between floor joists in an unfinished basement or crawl space
- Sealing rim joists with cut-to-fit rigid foam and canned spray foam
- Air sealing visible gaps around pipes, wires, and electrical boxes with caulk or foam
- Topping up existing attic insulation with blown-in fill using a rental machine
What's typically not DIY territory: insulating inside finished walls without opening them up, working near knob-and-tube wiring (a fire hazard that requires an electrician's assessment first), or installing spray foam systems that involve two-component chemical mixing. See The Honest Trade-Offs of DIY Insulation Installation for a balanced look at where the line is.
Safety Basics Before You Touch Anything
Insulation work involves materials and spaces that carry genuine hazards if you're not prepared. A few non-negotiables before you start:
- Protective gear: Fiberglass and mineral wool fibers irritate skin, eyes, and lungs. Wear a properly fitted N95 respirator (or better), safety glasses, gloves, and long sleeves for any work with these materials.
- Ventilation: Attics and crawl spaces trap heat and fumes. Work during cooler parts of the day, take breaks, and never work alone in confined spaces.
- Electrical awareness: Never pile insulation directly over recessed light fixtures not rated for insulation contact (look for an IC rating). Covering non-IC fixtures creates a fire risk. If you discover knob-and-tube or aluminum wiring, stop and consult a licensed electrician before proceeding.
- Older homes and hazardous materials: Homes built before the 1980s may contain asbestos in existing insulation materials. If you're unsure, have a sample tested before disturbing anything.
- Permits and codes: Some insulation projects - particularly those combined with other work - require permits. Verify requirements with your local building department before starting.
For a thorough walkthrough of standards, permit situations, and tasks that belong with licensed professionals, read Installing Insulation Safely.
This article is for general informational purposes only. Always verify local building codes, permit requirements, and consult licensed professionals for work involving electrical systems, hazardous materials, or structural elements.
Frequently Asked Questions
R-value measures how well a material resists heat flow. A higher R-value means stronger resistance and better insulating performance. The right R-value for your home depends on your climate zone and the area you're insulating, such as the attic versus exterior walls.
Common signs include uneven room temperatures, high heating and cooling bills, drafts near exterior walls, and ice dams on your roof in winter. A professional energy audit can pinpoint exactly where heat is escaping.
In most cases, yes - you can layer new insulation over old, as long as the existing material is dry, undamaged, and free of mold. If the old insulation is compressed, wet, or contains asbestos, it should be assessed or removed by a professional first.
Small-can spray foam for sealing gaps and cracks is a common DIY task. Two-component spray foam systems used in walls or large cavities require training, protective equipment, and in some situations permits - those jobs are generally best left to professionals.
It depends on your location and scope of work. Adding insulation to an accessible attic often does not require a permit, but insulating walls, dealing with hazardous materials, or combining insulation with electrical work typically does. Always check with your local building department before starting.
Batts are pre-cut blankets that fit between studs or joists - a common DIY choice. Blown-in insulation is loose fill blown into cavities or attics, useful for irregular spaces. Rigid foam boards are dense panels used on walls, foundations, or roofs. Each suits different applications and skill levels.
The content on this site is for informational purposes only and is not a substitute for professional advice. Always consult a qualified professional for guidance specific to your situation.