

Why Insulation Is Your Home's Most Valuable Energy Asset
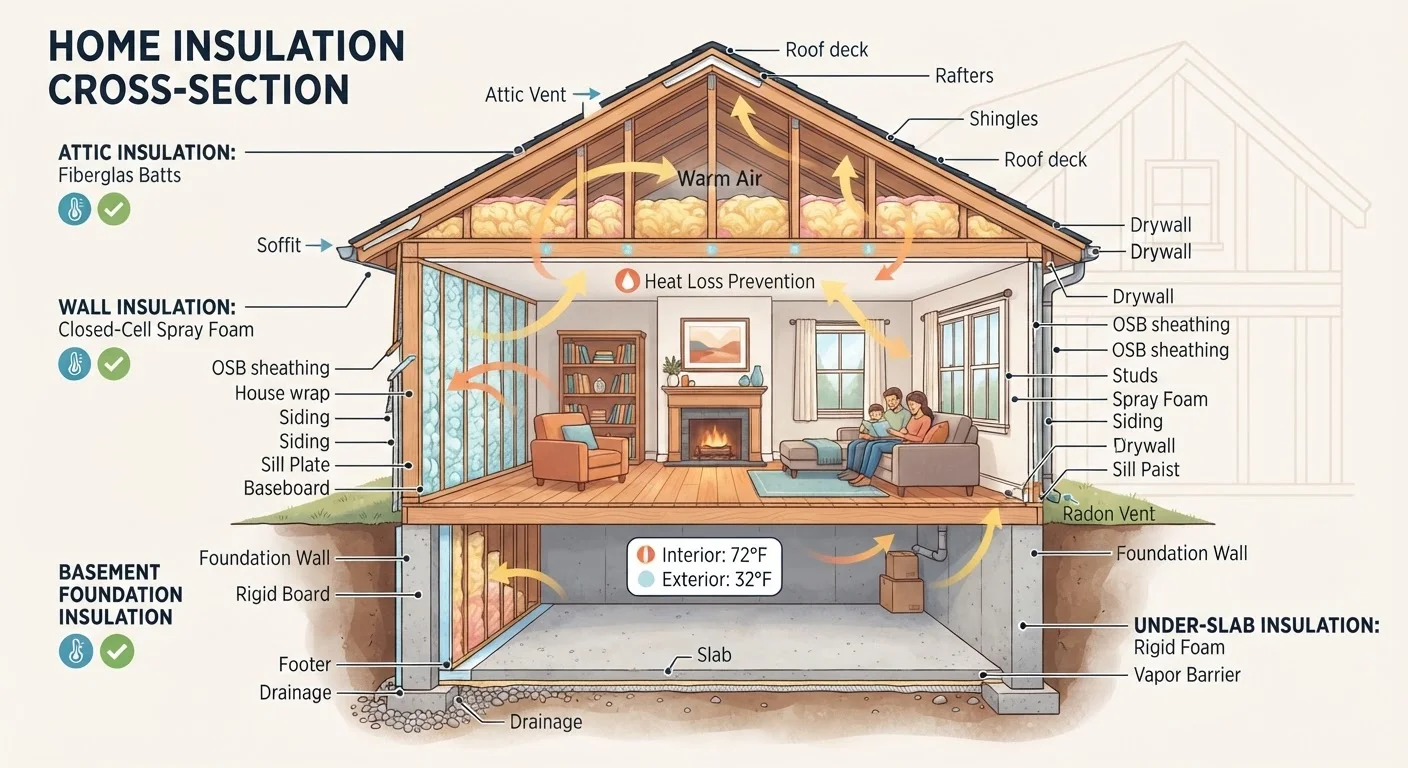
Heating and cooling account for roughly half of a typical household's energy bill. Insulation is the single passive measure that most directly controls how much of that conditioned air stays inside where it belongs. Without adequate insulation, you're not just losing comfort - you're continuously paying to replace heat or cool air that leaks away through walls, ceilings, and floors.
If you're new to the topic, the Practical First-Timer's Overview covers foundational concepts in plain language. This guide goes deeper, walking you through materials, placement priorities, and how to find and fix the gaps costing you money.
Insulation works by slowing the transfer of heat - keeping it outside in summer and inside in winter. But it only performs as designed when paired with proper air sealing. Air infiltration bypasses even thick insulation, so the two strategies work together, not independently.
Understanding R-Value: The Core Metric That Drives Performance
R-value is the measure of an insulation material's resistance to heat flow. The higher the R-value, the better the material resists transfer. Every climate zone in the U.S. has recommended minimum R-values published by the Department of Energy - colder climates require higher values, especially in attics.
A few practical points about R-value that often get overlooked:
- It's additive: Layering two R-19 batts gives you R-38 - this matters when upgrading existing insulation.
- Compression reduces it: Squeezing a batt into a space thinner than its design thickness lowers its effective R-value.
- It doesn't measure air sealing: A perfectly rated batt installed with gaps around electrical boxes still leaks air freely.
Before purchasing any material, check the manufacturer's data sheet for the rated R-value per inch. The spec information that actually matters for DIYers explains how to interpret those figures accurately.
When adding blown-in insulation to an attic, install temporary depth rulers - paint stirrers work well - every few feet so you can verify coverage depth before the job is considered complete.
Blown-in material distributes unevenly and can be difficult to assess by eye alone; rulers give you an objective check without digging through the material.
Air-seal attic penetrations with canned fire-rated foam or acoustical sealant before you add any insulation layer above them - once covered, these bypasses become nearly impossible to address.
Unsealed penetrations around pipes, wires, and light fixtures can transfer as much heat as a missing window; sealing them costs almost nothing and pays off immediately.
Common Insulation Materials and Where They Fit
Choosing the right insulation type isn't about finding the best product universally - it's about matching material properties to the specific location and conditions in your home. A detailed comparison of R-values, moisture behavior, and fire ratings is available in Insulation Materials Compared.
- Fiberglass batts
- Precut panels sized for standard stud and joist spacing. Easy for DIYers to handle in open wall cavities and attic floors. Affordable, widely available, but must fit snugly with no gaps or compression.
- Blown-in cellulose or fiberglass
- Loose-fill material blown into place using a rental machine. Ideal for attic floors, hard-to-reach cavities, and topping up existing insulation. Settles over time, so installers account for this in depth.
- Mineral wool (rock wool or slag wool)
- Higher density than fiberglass, better fire resistance, and naturally more resistant to moisture. Suited to areas prone to humidity or where fire separation is important.
- Rigid foam board
- Used on exterior walls, basement walls, and under slabs. Provides a continuous thermal barrier without thermal bridging through studs. Some types require a fire-rated covering when left exposed.
- Spray polyurethane foam (SPF)
- Two-component system that expands to fill cavities and seal air simultaneously. High performance but requires professional installation for the two-component version; small-can versions suit gap sealing only.
Each material's behavior with moisture varies significantly - common insulation myths addresses several misconceptions around vapor barriers and moisture management worth reading before you shop.
Where to Insulate First: Prioritizing by Impact
Not all insulation zones are equal in return on effort. Focus your time and budget on the areas that lose the most heat energy first:
- Attic floor or roof deck: Heat rises - an under-insulated attic is often the largest single source of heat loss in a home. This is also the most accessible DIY zone.
- Rim joists (band joists): The perimeter framing at floor levels is frequently uninsulated and highly prone to air leakage. Rigid foam or spray foam applied here has a strong impact relative to the small area involved.
- Exterior walls: Walls are harder to address without renovation work. If walls are open during a remodel, it's the ideal time to insulate them properly.
- Basement and crawl space: Insulating the basement ceiling or crawl space walls (depending on conditioned vs. unconditioned status) prevents cold floors and protects pipes.
- Around windows and doors: Gaps and compressed or missing insulation around rough openings are common - a can of low-expansion foam filler handles most of these.
For a broader look at material selection decisions in any of these zones, see the Building Materials hub for context on how materials are evaluated for different applications.
Safety, Permits, and When to Call a Pro
Insulation work ranges from genuinely safe DIY tasks to jobs with real health, fire, and code implications. Know the difference before you start.
Personal protective equipment (PPE) is non-negotiable. Fiberglass and mineral wool fibers irritate skin, eyes, and lungs. Always wear an N95 or higher respirator, safety glasses, gloves, and long sleeves when handling these materials.
Permits are sometimes required for insulation work, particularly when it involves changes to fire-rated assemblies, spray foam in certain quantities, or work in jurisdictions with energy code requirements tied to renovation permits. Check with your local building department before starting any significant project.
The safety standards and permit guide covers this in full detail, including which tasks are best handed off to a licensed contractor. Work near recessed lighting, electrical panels, or combustion appliances should always involve a qualified professional.
This article provides general educational information only. Always verify local building codes and consult licensed professionals before beginning insulation work that involves electrical, structural, or fire-rated systems.
Identifying and Fixing Insulation Gaps Yourself
You don't need an energy audit to find obvious insulation problems - though an audit, especially one using a blower door test and thermal imaging, gives a far more complete picture. Here's how to conduct your own preliminary assessment:
- Check the attic: On a cold day, look for uneven snow melt on the roof - bare patches where others hold snow indicate heat escaping through under-insulated spots below.
- Feel for drafts: Hold your hand near electrical outlets on exterior walls, around window frames, and at baseboards. Persistent cold air indicates air sealing failures as much as insulation gaps.
- Inspect the attic floor: Look for joists visible above the insulation - a sign the insulation has settled below recommended depth. Measure the depth and compare to the recommended R-value for your climate zone.
- Look for bypasses: Plumbing chases, recessed light housings, and attic hatch edges are common spots where thermal bypasses go unnoticed.
Fixing gaps in accessible areas is well within most DIYers' abilities. Adding blown-in insulation to an attic floor, air sealing around plumbing penetrations with fire-rated caulk or foam, and fitting a well-sealed attic hatch cover are high-impact, low-risk projects. For the hand tools you'll need to prep surfaces and work in tight spaces, the Essential Hand Tools hub covers the basics.
Start with air sealing, then layer insulation on top. That sequence - seal first, insulate second - consistently delivers better results than insulation alone.
The content on this site is for informational purposes only and is not a substitute for professional advice. Always consult a qualified professional for guidance specific to your situation.