

Why Zone Selection Changes Everything
Home insulation isn't a single project - it's a map of priorities. Heat moves toward cold through every gap, crack, and thin surface it can find, but it doesn't move equally from every part of your home. Some zones surrender warmth (or coolness) at a dramatically higher rate than others. Spending the same effort and money on the right zone first can yield several times the benefit of patching a low-loss area.
Understanding which zones drain energy fastest lets you sequence upgrades intelligently, especially when budget and time are limited. To build on the fundamentals of how thermal layers work together, see our guide on what every insulation layer actually does. Once you understand the physics, the priority list below makes immediate practical sense.
Check Before You Insulate
Adding insulation over existing moisture problems can trap water and accelerate structural damage. Before improving any zone, inspect for signs of water intrusion, condensation, or mold. Address moisture sources first - then insulate. If you're unsure about the condition of an area, a home energy auditor or building inspector can provide a professional assessment before you commit materials and labor.
Before you invest in materials, it's also worth checking for hidden warning signs of insulation failure - cold floors, uneven room temperatures, and rising bills often point directly to the zones below.
The Attic Floor
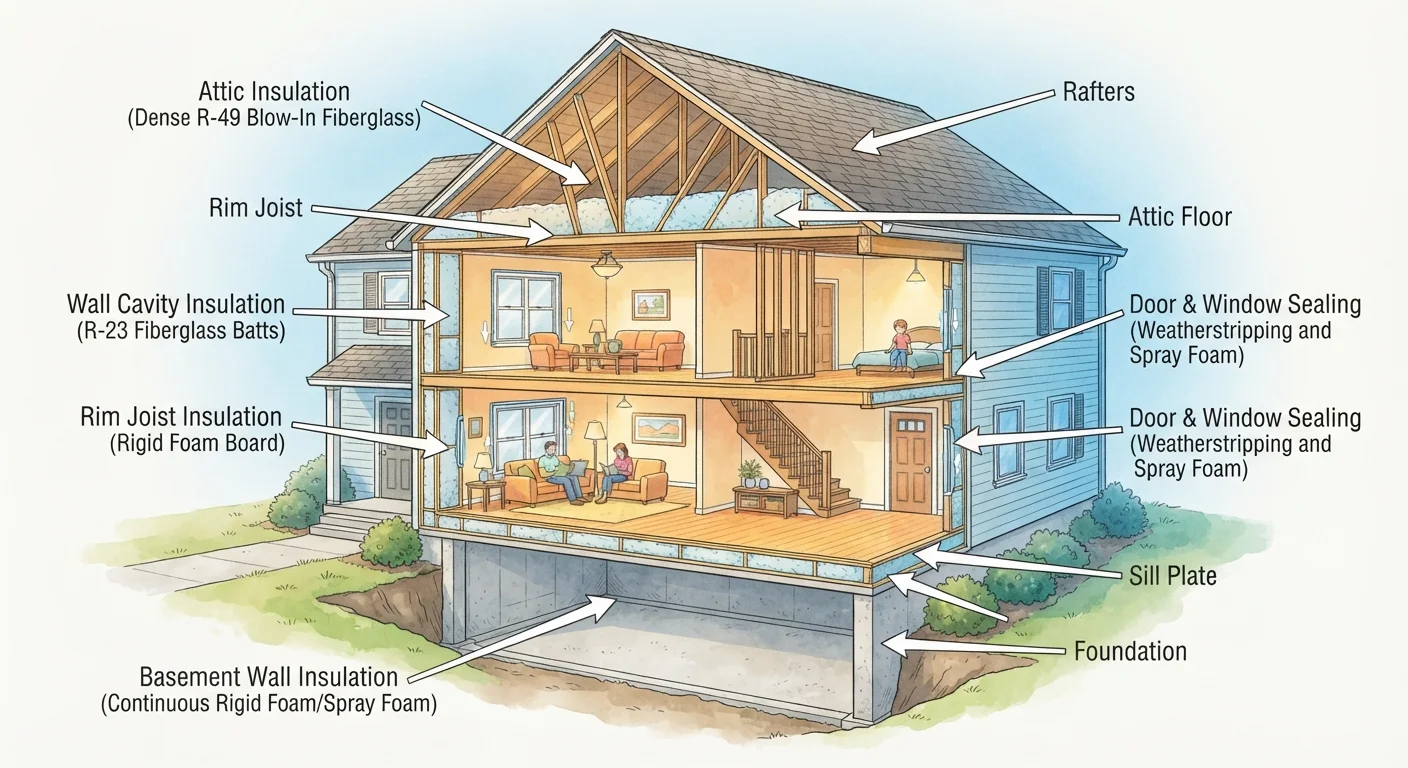
The attic is where most homes lose the greatest share of conditioned air. Heat rises naturally, and if your attic floor (the ceiling of your living space) is under-insulated, that warmth escapes before it can do any good. The U.S. Department of Energy recommends R-38 to R-60 for attic floors in most climate zones - many older homes fall well short of that.
Adding blown-in cellulose or fiberglass batts to an accessible attic is one of the more straightforward DIY projects for homeowners with basic skills. Before you add insulation, however, seal any penetrations - light fixtures, plumbing stacks, HVAC chases - with fire-rated caulk or foam. Air sealing first, then insulating, is the correct sequence for meaningful results.
An under-insulated attic floor is the single biggest energy drain in most American homes.
Rim Joists
Rim joists - the short wooden boards that cap the ends of your floor joists at the foundation level - are among the leakiest parts of a house per square foot. They sit at ground level where indoor conditioned air meets the cold foundation wall, and they're often completely uninsulated in homes built before the 1980s.
The good news: rim joists are accessible from inside your basement or crawl space and represent a genuinely manageable DIY task. Cut rigid foam board to fit snugly between joists, then seal all edges with spray foam to block both air and heat movement. This two-material approach - rigid foam for R-value, spray foam for air sealing - addresses both loss mechanisms at once.
Rim joists lose a disproportionate amount of heat for their size - and they're one of the easiest DIY fixes.
Basement Walls and Crawl Spaces
An unconditioned basement or vented crawl space can act like a refrigerator underneath your home. Cold surfaces radiate chill upward through your floors, drive up heating demand, and create comfort problems in rooms above. Insulating the interior of basement walls with rigid foam or batt insulation - and sealing crawl space vents in favor of a conditioned crawl design - can meaningfully reduce this effect.
Note that crawl space work often involves moisture management alongside insulation: vapor barriers on dirt floors and proper drainage are typically part of a complete solution. If your crawl space shows signs of standing water or mold, address those conditions before adding insulation. Some crawl space configurations may also require permits or professional assessment.
An uninsulated crawl space or basement wall is essentially a cold floor radiating upward through your entire home.
Exterior Door Perimeters
Doors themselves are rarely the weak link - modern insulated door slabs perform reasonably well. The real culprits are the gaps around the door frame: worn weatherstripping along the sides and top, a deteriorated door sweep at the bottom, and gaps between the frame and rough opening that were never properly caulked. A single exterior door with failing seals can leak as much air as a small open window.
Replacing weatherstripping and door sweeps is an accessible weekend project requiring only basic tools. For the gap between the door frame and the wall framing, low-expansion spray foam applied from inside offers a durable, low-cost fix. Check all exterior doors on a cold, windy day by holding your hand near the frame edges - drafts are usually easy to feel.
Worn door seals can leak as much air as a small open window - and replacing them takes an afternoon.
Knee Walls in Finished Attic Spaces
If your home has a finished attic - a bonus room, bedroom, or office carved out under the roofline - the short vertical walls (called knee walls) that border the usable space are a frequently overlooked energy drain. The unconditioned triangular spaces behind those walls are exposed to full exterior temperature swings, and the knee wall itself is often minimally insulated or uninsulated entirely.
Adding batt insulation to the stud cavities of knee walls, and installing rigid foam on the back side facing the unconditioned triangle, significantly improves thermal performance. For best results, also insulate the attic floor of those unconditioned triangular zones and ensure access hatches have gasketed, insulated covers. This is one zone where a combination approach - wall insulation plus floor insulation - pays off more than either alone.
Knee walls bordering finished attic rooms are frequently uninsulated - fixing them protects an entire living zone.
Start Here, Save More
Addressing these zones in order of impact - rather than convenience - is the principle behind smart home efficiency. Even partial improvements to a high-loss zone outperform complete fixes in low-loss areas. If you're just getting oriented, our practical first-timer's insulation overview walks through materials and safety fundamentals before you pick up a utility knife. And remember: insulation and air sealing work together. As we cover in our piece on why sealing air leaks beats upgrading your thermostat, closing gaps in the building envelope often delivers more comfort than any equipment upgrade. Work the zones below, and you'll feel the difference in your first heating or cooling season.
This article is for general educational purposes. Insulation requirements vary by climate zone, home construction type, and local building codes. Always verify permit requirements and consult a licensed professional for electrical, structural, or complex work.
The content on this site is for informational purposes only and is not a substitute for professional advice. Always consult a qualified professional for guidance specific to your situation.