

The Thermostat Is Not the Problem
When a home feels stuffy in summer or drafty in winter, the instinct is often to upgrade the thermostat - add scheduling, app control, or learning features. These tools have real merit, but they operate within a system that is already compromised if your home's shell is leaking air.
Think of it this way: a thermostat tells your furnace or air conditioner when to run. It cannot change where that conditioned air goes once it's in your home. If gaps around your attic hatch, basement rim joist, or electrical outlets are allowing warm air to escape in winter - or letting humid outdoor air pour in during summer - your HVAC system is essentially filling a leaking bucket. Running it longer, or running it smarter, doesn't patch the bucket.
Understanding what thermostats can and cannot fix helps homeowners invest in the right upgrades first.
Why Air Leaks Undermine Comfort So Effectively
Your HVAC system is sized to heat or cool a relatively stable interior volume. Air leakage disrupts that assumption constantly. In winter, every cubic foot of warm air that escapes is replaced by cold outdoor air that your furnace has to reheat. In summer, hot humid air infiltrating from outside adds both temperature and moisture load to your air conditioner.
The result is familiar: rooms that never quite reach the set temperature, cold floors even when the heat is running, stuffy upstairs spaces, and a system that runs longer cycles without delivering comfort. None of those symptoms improve meaningfully by upgrading the thermostat's intelligence - they improve when the leaks are sealed.
25-40%
Share of heating/cooling energy lost to air leaks
The US Department of Energy estimates that air leakage accounts for a substantial portion of a typical home's heating and cooling energy loss.
~1/3
Of a typical home's heat lost through the ceiling/attic
Energy audits consistently find the ceiling plane and attic bypasses responsible for a large share of total envelope heat loss in single-family homes.
ACH50
Standard metric for measuring home airtightness
Air changes per hour at 50 pascals (ACH50) is the benchmark used in blower door testing; many older US homes measure two to three times leakier than current code requires.
Identifying which zones lose the most energy is a practical first step before beginning any air sealing work.
Where Air Leaks Actually Hide
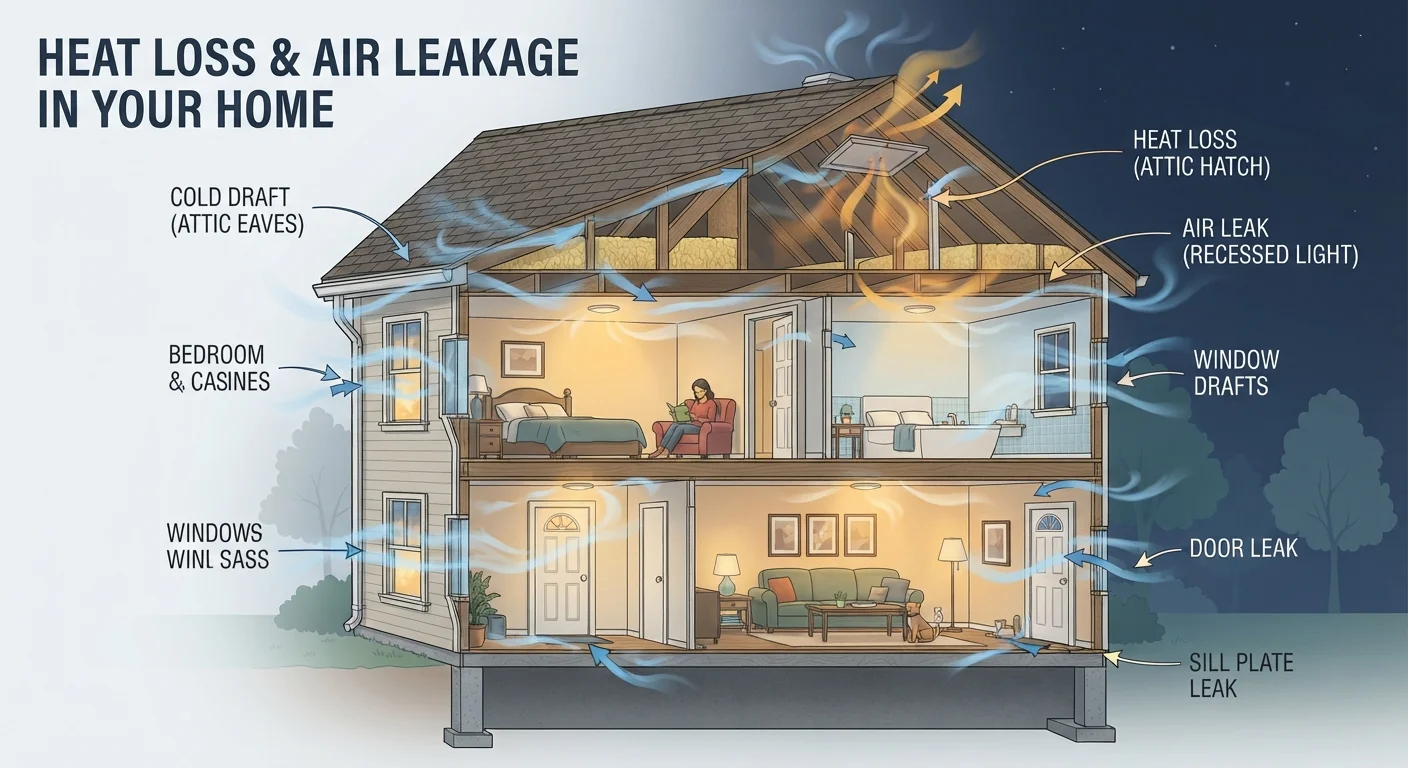
Most homeowners focus on windows and doors - and those are real contributors - but they're often not the biggest culprits. The US Department of Energy consistently identifies these locations as major sources of infiltration:
- Attic hatches and pull-down stairs: Unsealed attic access points can leak as much air as a small open window, because warm air rises directly toward them.
- Rim joists: The framing that sits atop your foundation wall is frequently uninsulated and unsealed, especially in older homes.
- Electrical outlets and switch plates on exterior walls: These small gaps add up across dozens of outlets.
- Plumbing and wiring penetrations: Pipes and cables passing through top plates or exterior walls leave gaps that installers rarely seal completely.
- Recessed ceiling lights: Older canister lights are notorious for leaking directly into attic spaces.
For a systematic approach, a room-by-room audit helps pinpoint exactly where your home is losing conditioned air.
Practical Air Sealing: Where to Start
Most air sealing projects fall into three categories of effort and cost:
- Quick wins (under an hour each)
- Add foam gaskets behind outlet and switch covers on exterior walls. Apply weatherstripping to exterior door frames. Caulk around window trim where it meets interior wall surfaces.
- Half-day projects
- Seal around attic hatch perimeters with weatherstripping and add rigid foam insulation to the hatch door itself. Apply low-expansion foam around any pipe or wire penetrations visible in your basement or crawlspace.
- Larger efforts worth planning for
- Rim joists in the basement can be insulated and sealed with rigid foam and caulk or foam sealant. Attic air sealing - closing gaps around top plates and light fixtures before adding insulation - delivers some of the highest returns of any home efficiency measure.
Draught-proofing your home without a major renovation covers many of these methods in accessible detail. And if your forced-air system is also losing conditioned air through leaky ducts, duct leakage is worth addressing alongside envelope sealing.
Note: Sealing around chimneys, gas flues, or combustion appliances requires fire-rated materials and should be evaluated by a qualified professional. Always verify local building codes and permit requirements before undertaking significant work in attic or basement spaces.
The Right Order: Seal First, Then Optimize
Once your building envelope is reasonably tight, every other efficiency upgrade becomes more effective. A programmable or smart thermostat can then actually deliver on its promise - because the home it's managing holds conditioned air instead of leaking it. Insulation performs better in a sealed assembly. Your HVAC runs shorter cycles, which reduces wear and lowers operating costs.
The sequence matters: seal the shell, then consider insulation improvements (the attic is usually the highest-priority zone), then optimize your mechanical systems. Skipping to thermostat upgrades first is a bit like buying a high-efficiency engine for a car with a hole in the fuel tank.
Air sealing won't make headlines the way smart-home gadgets do, but it addresses comfort problems at their source - which is exactly where your time and budget will go furthest.
Frequently Asked Questions
No. A smart thermostat optimizes when and how long your system runs, but it cannot stop conditioned air from escaping through gaps. Drafts and cold spots are caused by air leaks, and those require physical sealing to resolve.
On a cold, windy day, move a lit incense stick or a damp hand slowly around door frames, window edges, electrical outlets, and attic hatches. Flickering smoke or a chill indicates a leak. A professional blower door test gives a more complete picture.
Most surface-level air sealing - caulking windows, adding weatherstripping to doors, sealing outlet covers - is well within DIY reach. Sealing around flues, chimneys, or inside wall cavities may require professional assessment to avoid fire or moisture hazards.
Yes, very tight homes need controlled ventilation to maintain healthy air quality. If you undertake significant air sealing, consider consulting an energy auditor about whether mechanical ventilation - such as an energy recovery ventilator - is appropriate for your home.
Paintable latex caulk works well for stationary gaps around window and door frames. Foam sealant (low-expansion) is suited for larger gaps around pipes and wires. Weatherstripping handles moving parts like door bottoms and operable windows.
The US Department of Energy estimates that air sealing and insulation together can reduce heating and cooling costs significantly, though actual savings vary by climate, home size, and existing leak severity. Results depend on how leaky your home is to begin with.
The content on this site is for informational purposes only and is not a substitute for professional advice. Always consult a qualified professional for guidance specific to your situation.