

Why Bathrooms Are the Hardest Room to Keep Organized
Bathrooms pack more categories of stuff into less square footage than nearly any other room in the house. Toiletries, medications, cleaning supplies, towels, hair tools, and spare rolls all compete for limited counter, cabinet, and floor space. Add humidity into the mix and many standard storage materials - particleboard, paper-backed wire baskets, fabric bins - begin to degrade faster than you'd expect.
The good news is that bathrooms also respond quickly to targeted storage upgrades. Unlike a kitchen remodel or a garage overhaul, most bathroom storage improvements can be completed in an afternoon. The key is matching the right solution to your actual constraints: how much time you have, whether you're renting or own, and what kind of wall surface you're working with.
For a broader framework on tackling storage room by room, see our complete home organization guide. This article focuses specifically on bathroom solutions ranked by how quickly and durably they deliver results.
Over-Door Organizers
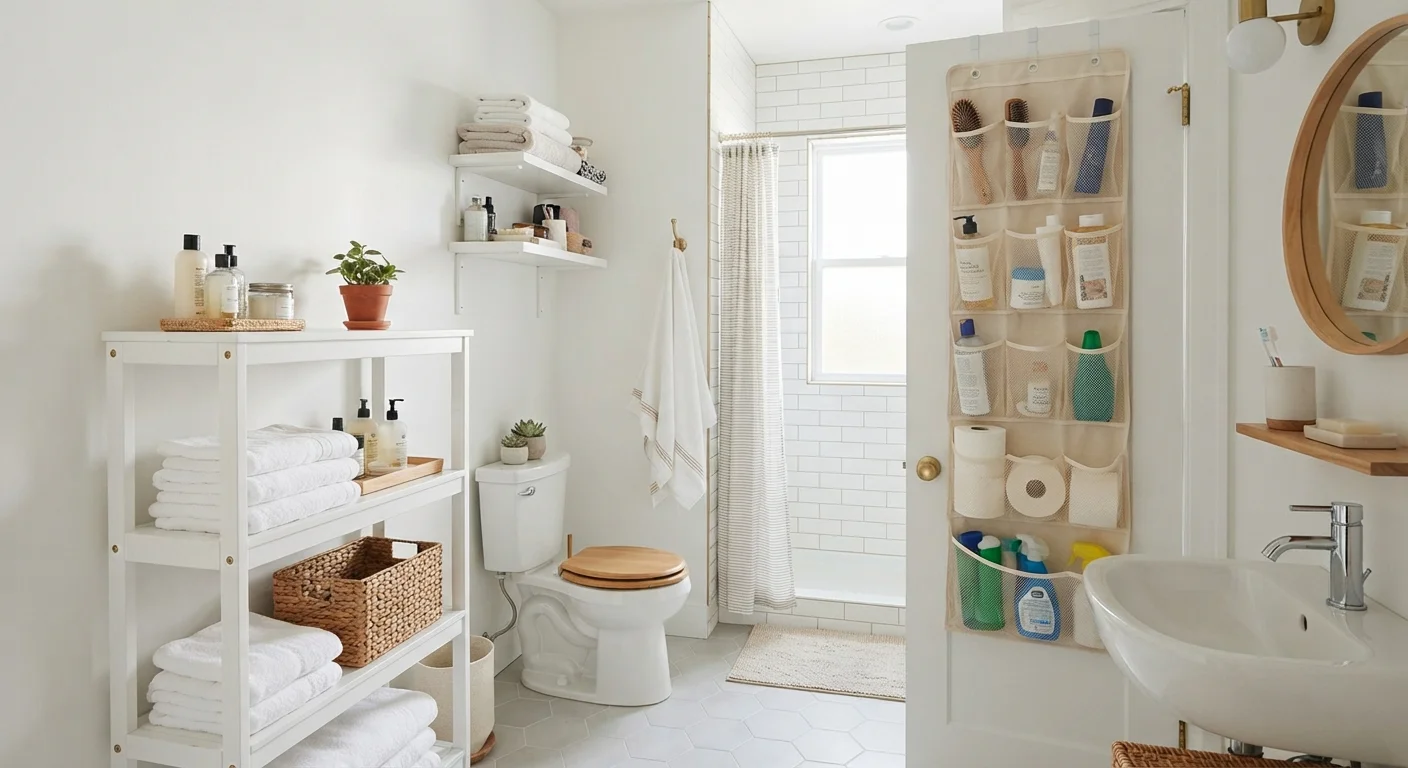
An over-door organizer requires no tools, no adhesive, and no damage to walls or doors - making it the fastest bathroom storage upgrade available. Most hang from the top of a standard door using a metal hook, and they're removable in seconds, which makes them ideal for renters.
Look for organizers with clear pockets (so you can see contents at a glance) or wire baskets (which allow air circulation, reducing mildew risk). Depth matters: deep pockets work well for full-size bottles, while shallower rows suit makeup, cotton rounds, and small accessories.
One limitation: over-door organizers work best when the door swings freely. If your bathroom door is frequently left open or swings into a narrow hallway, the organizer may catch on walls or trim.
Over-door organizers deliver immediate storage with zero tools and no wall damage.
Tension Rods Under the Sink
The under-sink cabinet is often wasted space - a single flat shelf where spray bottles, spare rolls, and random items pile up in an inaccessible heap. A tension rod installed horizontally across the interior creates an instant hanging bar for spray bottles (hook their trigger handles over the rod), freeing up the shelf below for bins and risers.
A single tension rod costs a few dollars and installs in under two minutes. You can also use two rods in parallel to create a suspended tray for flat items like cleaning cloths. No drilling required - the rod holds itself in place by pressure against both cabinet walls.
This approach pairs well with small plastic bins or stackable risers on the cabinet floor, which can roughly double usable vertical space beneath the pipes.
A tension rod under the sink doubles usable space in under two minutes with no tools.
Magnetic Strips for Small Metal Items
Magnetic strips, typically used in kitchens for knives, translate surprisingly well to bathroom drawers and cabinet interiors. Mounted inside a drawer or on the inside of a cabinet door, a magnetic strip corrals bobby pins, nail clippers, tweezers, and small scissors - items that habitually sink to the bottom of drawers and disappear.
For this to work reliably, the surface you're mounting to needs to be solid enough for the adhesive (most strips use strong peel-and-stick backing). Test the strip's weight rating against what you plan to hang, and keep it away from electronic devices that could be affected by magnetic fields.
This solution works best as a secondary layer of organization inside an existing drawer or cabinet rather than as a standalone surface-mount fixture.
Magnetic strips inside drawers keep small metal tools visible and immediately reachable.
Drawer Dividers and Insert Trays
Drawers without dividers are one of the primary reasons bathroom organization collapses within weeks of an initial tidy. Items migrate, stack, and mingle until the drawer becomes a single undifferentiated mass of products. Adjustable dividers or molded insert trays solve this by assigning a fixed zone to each category.
Adjustable bamboo or plastic dividers fit a wide range of drawer sizes and can be reconfigured as your storage needs change. Molded trays - designed for specific item categories like makeup or dental care - are less flexible but tend to be more stable.
Before buying any insert, measure your drawer interior carefully, including depth. A tray that's even half an inch too tall won't allow the drawer to close, which is a frustrating and avoidable mistake.
Fixed drawer zones are what prevent a tidy bathroom from reverting to chaos within weeks.
Floating Shelves on Solid Wall Sections
Floating shelves add permanent vertical storage without the footprint of a freestanding unit. In a bathroom, they work best above the toilet, beside a vanity mirror, or on the wall opposite the shower - areas with solid stud backing and lower direct moisture exposure.
Installation requires locating wall studs (or using appropriate drywall anchors rated for the intended load), a level, a drill, and basic hardware. The process typically takes one to two hours for a pair of shelves and produces a clean, built-in result that no freestanding unit can replicate.
One important caveat: avoid mounting shelves directly above a shower or bathtub where steam is constant. Moisture accelerates finish wear and can compromise both the shelf and its fixings over time. For a detailed look at weighing this trade-off, see the open shelving vs. closed storage comparison.
Floating shelves above the toilet use genuinely wasted vertical space without touching the floor plan.
Recessed Shower Niches
A recessed niche - a shelf cut directly into the shower wall between studs - is the most involved option on this list, but it's also the most durable and the cleanest-looking. Unlike a corner caddy that rusts or a suction-cup shelf that falls mid-shower, a properly built niche is a permanent fixture.
The basic process involves cutting into drywall or cement board between two studs, framing the opening, and finishing the interior to match surrounding tile. This is a project for homeowners comfortable with tile work, and it typically takes a full weekend. If your shower walls are already fully tiled and grouted, retrofitting is more involved than building a niche during an initial tile installation.
Anyone unsure about wall construction - particularly in older homes where walls may contain unexpected plumbing or electrical runs - should consult a professional before cutting. Drilling into a live wire or water line turns a weekend project into an emergency repair. For more no-demo bathroom upgrades that sidestep this risk entirely, see our guide to bathroom refresh without touching plumbing or tile.
A properly built recessed niche outlasts every adhesive caddy you've ever owned.
Choosing the Right Fix for Your Situation
Not every solution belongs in every bathroom. A recessed niche is worth the effort in a tile shower you own, but impractical in a rental. An over-door organizer suits a household with lots of small items but may feel cluttered in a minimalist space. Before committing, ask yourself three questions: Do I own or rent? How many people share this bathroom? And what's my realistic time window - 30 minutes, an afternoon, or a full weekend?
Start with a 10-Minute Audit
Before buying a single bin or bracket, remove everything from your bathroom surfaces and cabinets and group items by category: daily use, weekly use, backstock, and rarely needed. This audit alone often reveals that a third of what's stored in the bathroom doesn't need to be there at all - freeing up existing space without spending anything. Only then does it make sense to shop for organizers sized to your actual categories.
If humidity has already damaged existing shelving or cabinet interiors, address that first. Moisture-damaged particleboard won't hold screws reliably, and adding more storage on top of a failing structure only delays the real fix. For a deeper look at weighing open versus closed storage in wet environments, the article on open shelving vs. closed cabinets in the bathroom covers humidity, accessibility, and aesthetics in detail.
If the under-sink cabinet is the main source of chaos, a dedicated pull-out system can help - see the step-by-step project guide for building a two-tier pull-out organizer before you invest in more bins that won't solve the underlying layout problem. And if you're interested in creative, low-cost approaches, our unexpected household items as DIY organizer components article is worth a look before your next hardware store run.
Storage solutions described here are general recommendations. Results vary depending on wall construction, humidity levels, and individual use. Always follow manufacturer guidance for weight limits and installation, and verify that any drilling or structural modification is permitted in your lease or local building context.
The content on this site is for informational purposes only and is not a substitute for professional advice. Always consult a qualified professional for guidance specific to your situation.